Ender Dragon Guide

Table of Contents
Introduction
Note that the Ender Dragon is a very difficult fight. Even with perfect information and the best vanilla gear, you will almost certainly NOT defeat it your first try - you will need to practice the mechanics several times to achieve victory. It is the “final boss” of Minecraft after all.
The fight is also NOT meant to be done solo. While it is possible to defeat the dragon solo, it is extremely challenging, and require top-end gear, top-end food/potions, top-end skills, and tons of practice.
This boss is about Accuracy, Mechanical Fluency, Quick Thinking, and Resource Management.
- You need to be able to hit your bow/crossbow shots on the dragon in a relatively quick manner
- There will be some mechanics that require you to perform specific actions besides “just hit the boss”
- Sometimes you will need to quickly decide what to do and pay attention to your surroundings
- There is a lot of unavoidable damage in the fight, so must be able to manage your healing resources and sustain yourself in a long battle of attrition

To enter the fight, jump into any End Portal. There is one at Spawn too. It is extremely highly recommended to practice the fight in Practice Mode before making real attempts.
Preparations
The following items are required to progress the fight:
- Empty glass bottles (or pre-bottled dragon breath)
- Diamond Pickaxe or better, with Efficiency IV or better
- Power IV bow/crossbow or better
Without at least the following gear, you will almost certainly die a very quick and horrible death:
- Full Protection IV Netherite or Diamond armor, or better
- Perfect Gems are highly recommended
- Sharpness V Netherite or Diamond sword, or better
- Perfect Gems are highly recommended
- Power Sword is recommended for mobility
- Power V Bow or Crossbow, the best tier you can get
- The highest tiered arrows you can afford - at least 5 stacks
- A Quiver can help in carrying more arrows
- Perfect Gems are highly recommended
- The highest saturation food you have, golden carrots or better, at least 3 stacks
- Healing items, ALL of:
- Golden apples, or better
- Splash potions of Healing II or Super Healing
- Flasks of Healing II or Super Healing
- Buff food, ALL of:
- Bacon Cheeseburger (+10% damage)
- Fugu (+0.15/s regen) / Grilled Lobster Tail (+0.25/s regen)
- Chicken Caesar Salad (+4 health) / Lavish Potato Salad (+8 health)
- Oysters on the Half-shell (+3% damage resistance)
- Buff potions, ideally filled into flasks, ALL of:
- Strength II, Super Strength, or better
- Speed II, Super Speed, or better
- Ranging II, Super Ranging, or better
- A Super Combat potion packages all Super potions into one inventory slot
The following are nice to have, and not having them will make your life a LOT harder:
-
- Heal (will NOT be able to sustain you on its own)
- Water (for Endermen)
- Surge/Flash/Shade Shift (for movement)
- Phoenix Down (Greaters are recommended)
- Potions of Rescue
The following are nice to have because they save some prep time:
- Crafting table
- Axe
- Dragon breath
- Purpur blocks
- Scaffolding blocks
- Water bucket
Example inventory setup:

The Fight
Attacks
Basic Attacks
The Ender Dragon has several basic attacks that will be used very frequently.
Ender Missile
The dragon launches several homing missiles at several players. These missiles do moderate damage and cannot be avoided, though blocking them with a shield will reduce the damage taken by 50%. One missile is fired per player, up to 5, with an additional missile fired for every 3 players after that.
- In Hard mode, the shields have no effect on this attack
Ender Ball Spray
The dragon sprays several ender fireballs at a random target, which explode and deal area damage, along with leaving a lingering dragon breath puddle. Each fireball has a chance to spawn Endermites upon impact.
Firebreath
This attack is only used if a player is within 24 blocks of the dragon.
The dragon fires several non-homing, inaccurate flame projectiles in rapid succession at the closest target, which ignite the target and ignore i-frames. Fire Resistance does not prevent damage from these projectiles.
This attack can deal a ton of damage if all the flame projectiles hit (more likely the closer you are to the dragon), and will likely kill you if that happens.
Summon Chorus Tree
This attack is only used during Phase 2: Armor Break of the fight.
The dragon causes the ground under up to 4 players to rumble, growing a chorus tree moments later. If the player does not move from their spot before the tree erupts, they are dealt considerable damage. This attack can only target players who are standing on End Stone.
Special Attacks

These are attacks that are used more infrequently, show up as a cast bar, and may have special mechanics that need to be handled.
Fireball
The dragon launches a homing fireball at a random player, which deals high AoE damage upon landing. This attack cannot be blocked or avoided.
Crashing Descent
The dragon lands on the portal and perches, dealing damage and applying Weakness to players who are close to the portal. After a few seconds, or upon taking 30 damage, the dragon will take off again.
- In Hard mode, the damage threshold is increased to 60
Spiraling Descent
The dragon lands on the portal and perches, dealing damage and applying Weakness to players who are far from the portal. After a few seconds, or upon taking 30 damage, the dragon will take off again.
- In Hard mode, the damage threshold is increased to 60
Call of the End
The dragon summons multiple endermen. The number of endermen summoned is equal to 3, plus an additional 1 for every 5 players in the fight.
- In Hard mode, 1.5 endermen are summoned for each player, rounded up, with a minimum of 6 and a maximum of 12.
Downdraft
The dragon deals large knockback to all players, originating from the portal at the center of the arena. At the same time, any players at the portal in the center of the area are dealt heavy damage and inflicted with Weakness.
Fire Storm
The dragon launches Fireball attacks at every player, with a small delay between each.
Construct Pylons
The dragon summons 3 Draconic Pylons. The pylons deal massive melee damage if touched, and will repeatedly cast Outburst, dealing moderate party-wide damage, if not killed fast enough.
Draconic Rage
The dragon deals moderate-high damage to all players, while increasing the dragon's Rage meter by a small amount. This attack cannot be blocked or avoided.
Scorching Flame
The dragon summons 4 Convenient-looking Pylons, one at one end of the arena, and 3 at the other end of the arena. Then the dragon fires a large swathe of purple fire at a random player. Upon impact, the purple fire will deal a massive amount of damage, split between all players (and pylons) hit in its radius. This attack cannot be blocked or avoided.
If a player would die from purple fire, they will cause a secondary explosion, dealing moderate unblockable damage to all living players and inflicting them with Weakness. This secondary explosion is caused even if a Totem of Undying is used, and will likely immediately kill the player who totem-ed.
- In Hard mode, no Convenient-looking Pylons spawn, forcing players to split damage with other players
White Fire
The dragon summons a Convenient-looking Pylon. Then the dragon fires one white fireball for every 2 players (rounded up) at random players. Each white fireball must be shared with one other player or pylon which has not already shared a white fireball. This attack cannot be blocked or avoided.
If the fireball is not shared, or if a player tries to share more than one fireball, it deals significant unblockable damage to the target, and deals a secondary shockwave that deals unblockable damage and inflicts Weakness to all players.
- In Hard mode, no Convenient-looking Pylons spawn, forcing players to group up with other players
Ender Orb
The dragon drops a series of 4 orbs, starting at a random place in the area and moving either clockwise or counter-clockwise. When the orb hits the ground, if there is not at least one player standing in its impact zone, a Buff Enderman will spawn. Buff Endermen have high health, speed, and damage, and possess a special attack that lifts a player high into the air before dropping them. The ring of particles around the orb will turn from red to blue when the mechanic's condition is satisfied.
- In Hard mode, each orb must be soaked by a minimum of 3 players each, with one Buff Enderman spawning for each missing player
Draconic Fury
The dragon gathers its strength for a powerful fire attack, giving you ample time to prepare. At the time the attack is unleashed, all players will be dealt massive unblockable damage, likely killing them right away, and also inflicted with a long and severe Burn debuff that deals high unblockable damage over time. Damage from this attack can be reduced by having at least one purpur block between you and the dragon. Damage from this attack can be further reduced by also having a purpur block above your head. If damage from this attack is reduced twice, no Burn debuff will be applied. Increases the dragon's Rage meter by a moderate amount.
Eldritch Sludge
The dragon unleashes a swathe of sludge, which bounces throughout the arena, randomly targeting players' locations and dealing high AoE void damage if the player does not move. After every 5 bounces, the sludge will home in on a random player, unavoidably targeting them with a sludge AoE hit. There is no way to remove the sludge from the arena.
- In Hard mode, an additional Eldritch Sludge is released for every 3 players in the arena, rounded down, with a minimum of 1 (2 total) and a maximum of 3 (4 total).
Phases
The fight is split up into 3 main phases, with the last phase having 4 sub-phases.
Phase 1: End Crystals

This phase works the same as the normal Ender Dragon fight, except the dragon is fully invincible until all crystals are destroyed. Destroyed crystals can drop some supplies: Ender Porkchops, Ender Golden Apples, and Ender Splash Potion of Healings, which function as normal, but will disappear when you leave the fight. Additionally, the crystals will drop 4 Scrawled Notes, which give you the solution for how to complete the next phase.
The dragon will constantly attack using Ender Missiles and Ender Ball Spray.
Scrawled Notes I:
Successor - I don't have much time so heed my warning: even if the crystals are destroyed, the dragon's scales are still too tough to damage normally. You need to break the armor with a special arrow and bow
Scrawled Notes II:
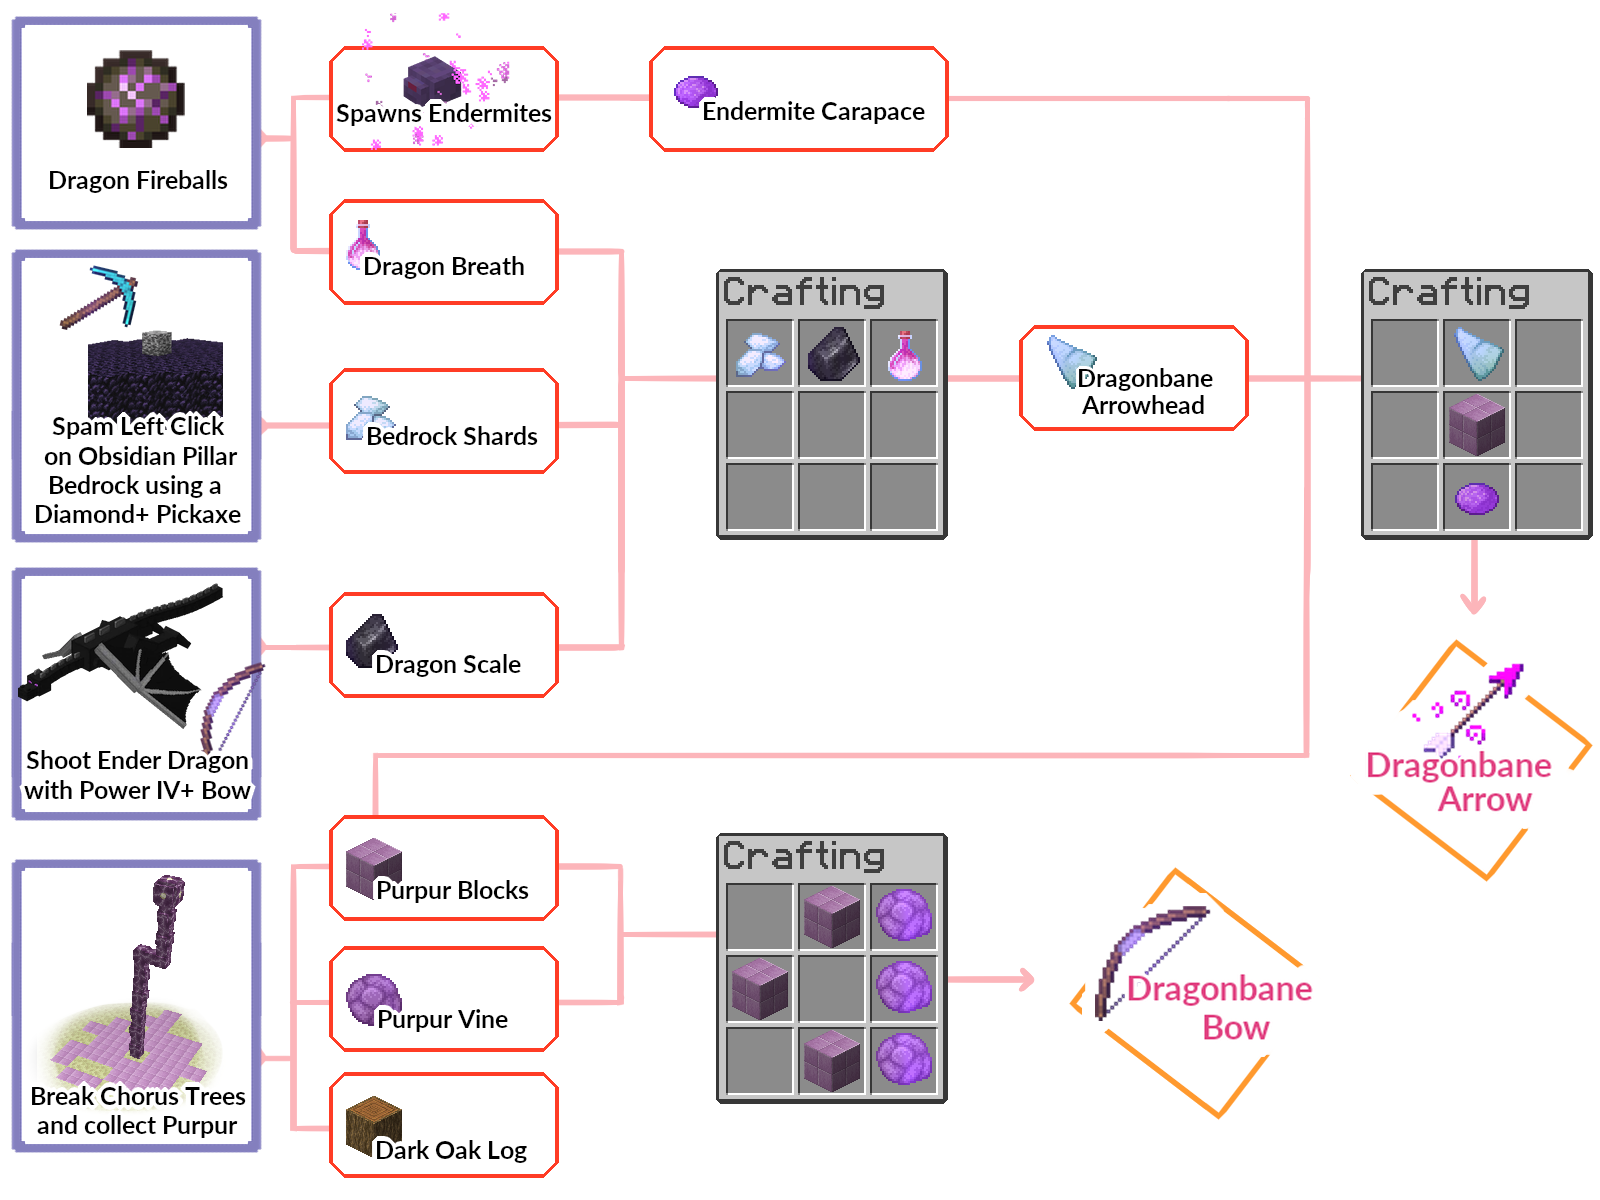
To make the arrowhead, combine: bedrock shards + dragon breath + dragon scale. Hit bedrock with a diamond pickaxe or better to scrape it for shards. Shoot the dragon with a powerful bow to knock off scales.
Scrawled Notes III:
For the arrow, use a purpur block as the arrowshaft. Endermites from the dragon's fireballs can be skinned for for carapace to substitute the feather. When all crystals are destroyed, Chorus Trees will start spawning.
Scrawled Notes IV:
Break Chorus trees for Chorus Vines, and use 3 purpur blocks + 3 chorus vine to craft the special bow. SAVE the purpur blocks -- they'll soak the worst of the dragon's fury. use to build a shelter and hid= : -' .
Phase 1 immediately ends when the last End Crystal is broken. It is recommended to use this time to stock up on Endermite Carapace, Bedrock Shards, and Dragon Breath to speed up Phase 2 preparations. If you brought purpur, you should also use this time to construct purpur block shelters for Draconic Fury later.
Phase 2: Armor Break

Phase 2 begins with the appearance of two new meters at the top of your screen: Armor and Rage. The goal of this phase is to deplete the dragon's Armor meter by shooting it with Dragonbane Arrows using a Dragonbane Bow as fast as possible, in order to keep the Rage meter as low as possible. The phase ends when the last point of Armor is depleted.
This phase is not combat oriented; rather, it is a phase about gathering resources and crafting (you know, half of what Minecraft is about). You and your team must craft a special bow and arrows to take down the dragon's armor, using materials scavenged from the End arena.
The dragon will attack with all attacks from Phase 1: End Crystals, in addition to Summon Chorus Tree.
Rage Meter
The Rage meter slowly fills up during the Armor Break phase, and will no longer passively fill once the phase is over. The Rage meter also increases slightly whenever the dragon uses Draconic Rage, increases moderately whenever the dragon uses Draconic Fury, and increases significantly a single time when the Armor Break phase ends.
Rage increases the damage dealt by the dragon's attacks - up to a 50% (100% in Hard mode) damage increase at full Rage. Therefore, to reduce the damage taken throughout the rest of the fight, this phase must be taken down as fast as possible. After the Rage bar fills completely, no additional negative effects occur.
Armor Meter
The Armor meter shows how many more shots with a Dragonbane Arrow must be landed to complete the phase. The dragon starts with 3 points (12 points in Hard mode) of Armor, with each successful shot removing one point. Dragonbane Arrows require a Dragonbane Bow to shoot, cannot be retrieved once shot, and do not work with Infinity (duh).
The process for crafting the Dragonbane Bow and Dragonbane Arrows is outlined in the Scrawled Notes obtained from shooting down the Crystals.
[Show Spoiler:] Crafting the Dragonbane Bow/Arrows
Tips:
- While you only need to hit the dragon 3 times (12 times in Hard mode) with Dragonbane Arrows, it is possible to miss, so it is likely you'll need to craft more than 3 arrows
- If you have a team, you should divide responsibilities so that you can gather all supplies in parallel. Time is at the essence after all!
- While certain items cannot be taken out of the fight, there are some items that can be prepared ahead of time to reduce the time you spend in this phase (and thus the amount of Rage the dragon accumulates):
- Dragon Breath and Purpur blocks can be taken out of the fight, or brought back in
- Endermite Carapace and Bedrock Shards can be gathered in Phase 1: End Crystals before all the crystals are broken
- Having a central chest and crafting table may be helpful in coordinating a team of gatherers
When the last Armor point is depleted, the dragon's Rage meter will increase significantly, and the last major phase of the fight will begin.
Phase 3: Mortal Combat
This is the phase where your team finally faces off against the dragon - you are able to damage the dragon freely using weaponery. The dragon is immune to all non-player damage sources (such as beds and TNT), and has a damage cap of 20 per hit. Additionally, the dragon will never perch on its own - only perching after certain special attacks.
Rage retained from Phase 2: Armor Break is retained for the rest of the fight, though will no longer passively increase. Between each sub-phase, you will have a few seconds of respite while the phase changes. Use this time to heal back up, calm your nerves, and resolve any lingering mechanics from the previous phase.
Throughout all sub-phases, the dragon constantly attacks you with Ender Missiles and Ender Ball Spray.
Phase 3.1:

Phase 3.1 is the first health bar.
The dragon uses the following Special Abilities:
- Fireball
- Crashing Descent
- Spiraling Descent
- Call of the End
If you have not already, it is recommended to construct purpur block shelters here in anticipation of Draconic Fury later.
Phase 3.2:

Phase 3.2 is the second health bar. The frequency of normal attacks and special attacks increase slightly.
The dragon uses the following Special Abilities:
- Fireball
- Crashing Descent
- Spiraling Descent
- Call of the End
- Fire Storm
- Draconic Rage
- Scorching Flames
- Downdraft
Phase 3.3:

Phase 3.3 is the third health bar. The frequency of normal attacks and special attacks increase slightly.
The dragon uses the following Special Abilities:
- Fireball
- Crashing Descent
- Spiraling Descent
- Call of the End
- Fire Storm
- Draconic Rage
- Scorching Flames
- Downdraft
- Construct Pylons
- White Fire
- Draconic Fury
- Ender Orb
Remember to hide inside a purpur shelter before Draconic Fury finishes casting, or you will almost certainly die!
Phase 3.4:

Phase 3.4 is the fourth health bar. The frequency of normal attacks and special attacks increase slightly. This phase has slightly lower health than the other phases.
The dragon uses the following Special Abilities:
- Fireball
- Call of the End
- Fire Storm
- Draconic Rage
- Scorching Flames
- Downdraft
- Construct Pylons
- White Fire
- Draconic Fury
- Ender Orb
- Eldritch Sludge
The dragon starts out the phase with Eldritch Sludge, and will never perch during this phase. Be careful of your teammates when hiding from Draconic Fury - bringing one or more sludges into your group's shelter is a quick way to end the run.
Final Stand:

Final Stand is the last health bar. The frequency of normal attacks increase significantly. This phase has significantly less health than the other phases.
The dragon follows the following pattern of Special Attacks for this phase:
- Draconic Fury
- Draconic Rage
- Draconic Rage
- Draconic Rage
- Draconic Rage
- (Repeat x 1)
- To Ashes
- In Hard mode, this phase has noticeably more health, and the Fury/Rage cycle will repeat an additional time before To Ashes is used
This phase is a final damage race between you and your opponent. To Ashes has a very long castbar and instantly and unavoidably kills all players in the arena, ending the fight instantly. Your only counterplay is to kill the dragon before that attack finishes.

Damage during this phase can get overwhelming very quickly, between the need to avoid Draconic Fury, the need to dodge the Eldritch Sludge, and the rapid Draconic Rage's in succession. You will need to expend a lot of healing resources (potions, golden apples) and carefully balance that against your need to deal damage (before To Ashes) in order to succeed. Make sure to keep your health high to avoid getting chipped out by the constant damage!
The dragon will never perch during this phase.